Itanium machines were the first publicly available computers that would use EFI to boot operating systems. After posting the firmware would look on the selected disk, be it a hard disk, CD or USB device, for a file called BOOTIA64.EFI located in the folder \EFI\BOOT.
Windows XP was the first publicly released Operating System to be able to boot from EFI. However if you take a look at the file structure of the CD, you will find that there is no EFI folder and no trace of a file called BOOTIA64.EFI. How the heck can the OS boot from the CD then?
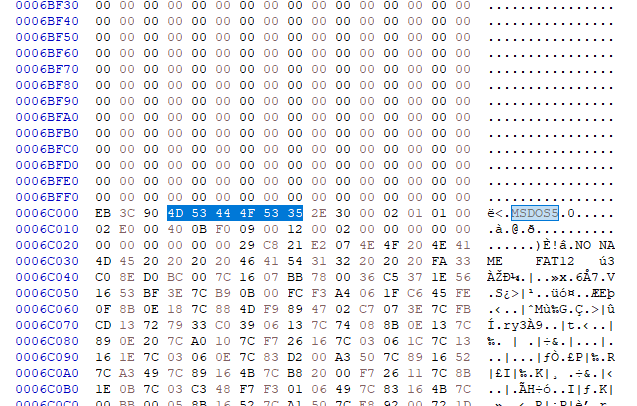
The trick is a hidden floppy disk image as a boot image. For example on the Windows XP 64-bit 2003 Edition CD it can be found at the address 0x6C000. The image itself only contains two files:
- \EFI\BOOT\BOOTIA64.EFI
- \SETUPLDR.EFI
These files are enough to kickstart the text mode installer, which will then attempt to read the remaining required files from the CD drive that this image was found on. Since this mechanism relies on it being part of the CD, USB boot will not work if you place the EFI files onto the USB drive.
To mark a CD as bootable, it contains an "El Torito" platform id marker of 0xEF. On an x86 system that marker would be 0x00.
Creating a bootable disk image
To create a bootable disk image, you need the following:
- All the required setup files
- A copy of the boot floppy image
- Microsoft CDIMAGE, version 2.52p recommended
Extracting the boot floppy image can be a bit tricky. Normally tools like 7-zip would make that easy, however 7-zip only lets you extract the first 512 bytes of the image which is not enough. The easiest would be a hex editor like HxD:
- Open the original Windows ISO in HxD
- Search for the Text String "MSDOS5", the result should look something like this:

- Place the cursor at the beginning of the line (in the example before "EB") and right click -> Select block
- Select "Length" and "dec" from the options, then enter 1474560. That is the size of a floppy disk in bytes.
- Once the area has been selected, navigate to File -> Save selection. Now the disk image can be saved somewhere convenient. It is common to give it the file type .img, .ima or .flp, but that is not mandatory.
Now that the image has been extracted, you could open it with something like WinImage in case you want to modify the files contained within.
Once you have everything ready, launch a cmd console in the path where your cdimage.exe lies and run this command:
cdimage.exe -nt -o -m -xx -b<floppyimage> -p239 -e -l<volume label> <input folder> <output ISO file>Note that there is no space between the flag and the file name like in modern command line programs. The flag -b would set the file name of the boot floppy image and -l sets the name of the image, the one that will be shown in My PC when you insert the CD. If you want to set the date of the ISO and all its files to a specific date like Microsoft does, you can use this command:
cdimage.exe -nt -o -m -xx -b<floppyimage> -p239 -e -g224 -l12/31/2000,12:00:00 -l<volume label> <input folder> <output ISO file>Here the date would be set to the 31st of December 2000, 12 PM, adjusted for the UTC-8 Timezone which the -g flag handles. Depending on the time zone set on your PC, the resulting file dates may vary. When in doubt, you could compare them to a legit ISO from Microsoft to see if you managed to set the same date.
The resulting ISO image can be burned with any tool such as ImgBurn or booted in a HP-UX virtual machine.